Android SDK是为Android平台开发者接入“云推送”服务而提供开发者工具包,开发者需要在应用中正确集成Android SDK才能使安装该应用的Android设备接收到云推送服务端发送的各类消息。
关于如何开通云推送服务,请参考 接入指南,在开通推送服务后,可以通过快速开始一节内容了解如何快速构建一个Android应用并接收消息。
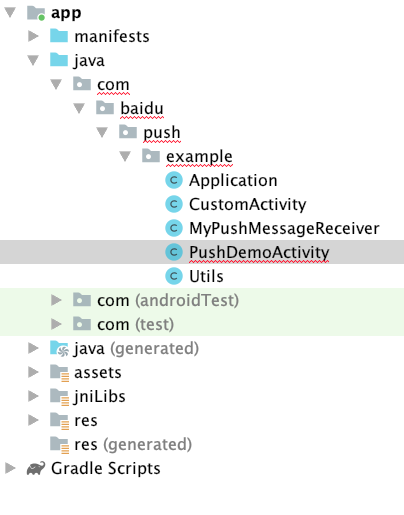
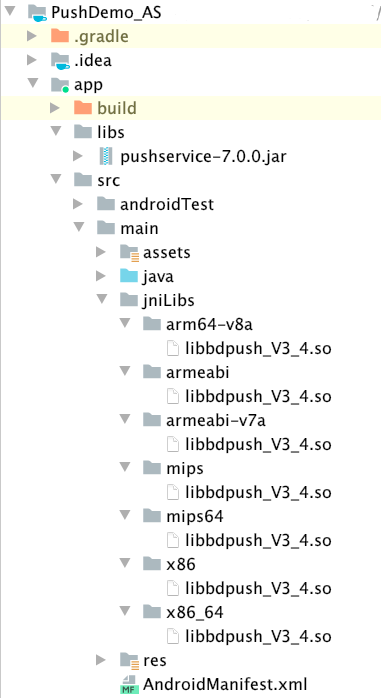
下载最新的Android SDK压缩包并解压,需要使用Java8及以上版本并使用Android Studio,导入Android工程示例(Demo)。此时会看到Demo工程中有错误,把工程编码改为UTF-8,再打开左侧目录树,错误存在于PushDemo工程下src文件夹中,com.isoftop.push.example包路径下的PushDemoActivity.java文件中。
报错位置特别提醒开发者,在特定位置上一定要填上您获得的API Key,否则会绑定失效,无法接收到推送的消息。如需接入华为、魅族、OPPO、小米、VIVO厂商代理,请参考厂商接入文档。
华为最新HMS SDK下载及接入请参考华为推送开发准备
小米最新PUSH SDK请从小米开放平台下载
OPPO最新PUSH SDK请从OPPO PUSH 客户端SDK接口文档下载
VIVO最新PUSH SDK请从VIVO Android PUSH-SDK集成指南下载
魅族最新PUSH SDK请从Flyme推送SDK下载

首先需要把错误注释掉。

然后将AndroidManifest.xml 275行 “api_key”修改为您的API Key并保存,如下图所示。

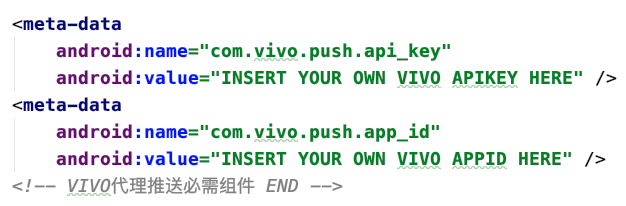
如果开启VIVO代理,请将AndroidManifest.xml中 "com.vivo.push.api_key"和 "com.vivo.push.app_id"对应的value修改为您在VIVO推送官网申请的APIKEY和APPID
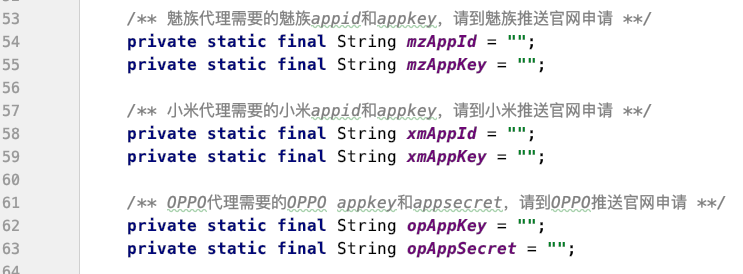
如果开启魅族、小米、OPPO代理,请将以下对应字段修改为您在对应厂商推送官网申请的值
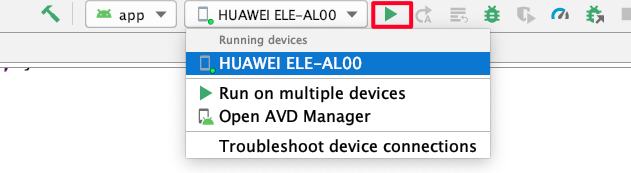
在Android Studio中选中您已连接的手机设备或Android虚拟机,并点击运行按钮,开始运行Demo。
下载最新的Android SDK压缩包并解压,在新建工程或已有工程中增加D推功能,如果您使用的是Demo示例,请直接跳到 推送,注意:如果您的Android工程使用的是Android API level 21及以上的版本,您的通知图标背景必须是透明的,否则在Android5.0及以上的机器上通知图标可能会变成白色的方块。
将解压后的libs文件夹中所有jar包拷贝到您的工程的libs文件夹中。如果工程中没有jniLibs目录,在工程中“src/main”目录中新建名为jniLibs的目录。如果您的工程中没有其他的.so文件,建议只拷贝armeabi文件夹到jniLibs目录。如果您的工程中还使用了其他的.so文件,只需要拷贝对应目录下的.so文件即可。 如下图所示
在当前工程的AndroidManifest.xml文件中,添加权限和声明信息(如需修改,可和我们进行联系):
<!-- Push service 运行需要的权限 -->
<uses-permission android:name="android.permission.INTERNET" />
<uses-permission android:name="android.permission.ACCESS_WIFI_STATE" />
<uses-permission android:name="android.permission.ACCESS_NETWORK_STATE" />
<uses-permission android:name="android.permission.VIBRATE" />
<uses-permission android:name="android.permission.DISABLE_KEYGUARD" />

<!-- Push service 运行的可选权限,android.permission.READ_PHONE_STATE 在小米上是必需 -->
<uses-permission android:name="android.permission.READ_PHONE_STATE" />
<uses-permission android:name="android.permission.RECEIVE_BOOT_COMPLETED" />

<!-- 适配Android N系统必需的ContentProvider写权限声明,写权限包含应用包名-->
<uses-permission android:name="isoftop.push.permission.WRITE_PUSHINFOPROVIDER.YourPackageName" />
<permission
        android:name="isoftop.push.permission.WRITE_PUSHINFOPROVIDER.YourPackageName"
        android:protectionLevel="signature">
</permission>
<!-- Push service 运行需要的权限 END -->


<!-- 小米代理运行需要的权限 -->
<uses-permission android:name="android.permission.INTERNET" />
<uses-permission android:name="android.permission.ACCESS_NETWORK_STATE" />
<uses-permission android:name="android.permission.ACCESS_WIFI_STATE" />
<uses-permission android:name="android.permission.READ_PHONE_STATE" />
<uses-permission android:name="android.permission.WRITE_EXTERNAL_STORAGE" />
<uses-permission android:name="android.permission.GET_TASKS" />
<uses-permission android:name="android.permission.VIBRATE" />
<!-- 小米推送权限 -->
<permission
        android:name="YourPackageName.permission.MIPUSH_RECEIVE"
        android:protectionLevel="signature" />
<uses-permission android:name="YourPackageName.permission.MIPUSH_RECEIVE" />
<!-- 小米代理运行需要的权限 END -->

<!-- VIVO代理运行需要的权限 -->
<uses-permission android:name="android.permission.INTERNET" />
<!-- VIVO代理运行需要的权限 END -->

<!-- push必须的组件声明 -->
<!-- 用于接收系统消息以保证PushService正常运行 -->
<receiver android:name="com.isoftop.android.pushservice.PushServiceReceiver"
    android:process=":bdservice_v1" >
    <intent-filter>
        <action android:name="com.isoftop.android.pushservice.action.notification.SHOW" />
        <!-- 以下六项为可选的action声明,可大大提高service存活率和消息到达速度 -->
        <action android:name="android.intent.action.BOOT_COMPLETED" />
        <action android:name="android.net.conn.CONNECTIVITY_CHANGE" />
        <action android:name="android.intent.action.MEDIA_MOUNTED" />
        <action android:name="android.intent.action.USER_PRESENT" />
        <action android:name="android.intent.action.ACTION_POWER_CONNECTED" />
        <action android:name="android.intent.action.ACTION_POWER_DISCONNECTED" />
    </intent-filter>
</receiver>

<!-- Push服务接收客户端发送的各种请求-->
<receiver android:name="com.isoftop.android.pushservice.RegistrationReceiver"
    android:exported="false"
    android:process=":bdservice_v1" >
    <intent-filter>
        <action android:name="com.isoftop.android.pushservice.action.METHOD" />
    </intent-filter>
</receiver>

<service android:name="com.isoftop.android.pushservice.PushService"
    android:exported="false"
    android:process=":bdservice_v1" >
    <intent-filter >
            <action android:name="com.isoftop.android.pushservice.action.PUSH_SERVICE" />
    </intent-filter>
</service>

<!-- 4.4版本新增的CommandService声明,提升小米和魅族手机上的实际推送到达率 -->
<service android:name="com.isoftop.android.pushservice.CommandService"
    android:exported="false" />

<!-- 适配Android N系统必需的ContentProvider声明,写权限包含应用包名-->
<provider
    android:name="com.isoftop.android.pushservice.PushInfoProvider"
    android:authorities="YourPackageName.bdpush"
    android:writePermission="isoftop.push.permission.WRITE_PUSHINFOPROVIDER.YourPackageName"
    android:protectionLevel = "signature"
    android:exported="true"
    android:process=":bdservice_v1" />

<!-- 可选声明, 提升push消息送达率 -->
<service
    android:name="com.isoftop.android.pushservice.job.PushJobService"
    android:permission="android.permission.BIND_JOB_SERVICE"
    android:process=":bdservice_v1" />

<!-- push必须的组件声明 END -->

<!-- 华为代理推送必需组件 -->
<activity
    android:name="com.isoftop.android.pushservice.hwproxy.HwNotifyActivity"
    android:exported="true"
    android:launchMode="singleTask"
    android:theme="@android:style/Theme.NoDisplay">
        <intent-filter>
            <action android:name="android.intent.action.VIEW" />
            <category android:name="android.intent.category.DEFAULT" />
            <data
                    android:host="bdpush"
                    android:path="/hwnotify"
                    android:scheme="isoftoppush" />
        </intent-filter>
</activity>

<!-- 华为HMS接入声明service -->
<service
    android:name="com.isoftop.android.pushservice.HmsPushPatchMessageService"
    android:exported="false">
    <intent-filter>
        <action android:name="com.huawei.push.action.MESSAGING_EVENT" />
    </intent-filter>
</service>
<!-- 华为代理推送必需组件 END -->

<!-- 小米代理推送必需组件 -->
<service
    android:name="com.xiaomi.push.service.XMPushService"
    android:enabled="true"
    android:process=":pushservice" />

<!--注:此service必须在3.0.1版本以后(包括3.0.1版本)加入-->
<service
    android:name="com.xiaomi.push.service.XMJobService"
    android:enabled="true"
    android:exported="false"
    android:permission="android.permission.BIND_JOB_SERVICE"
    android:process=":pushservice" />

<service
    android:name="com.xiaomi.mipush.sdk.PushMessageHandler"
    android:enabled="true"
    android:exported="true" />

<!--注:此service必须在2.2.5版本以后(包括2.2.5版本)加入-->
<service
    android:name="com.xiaomi.mipush.sdk.MessageHandleService"
    android:enabled="true" />

<receiver
    android:name="com.xiaomi.push.service.receivers.NetworkStatusReceiver"
    android:exported="true">
        <intent-filter>
            <action android:name="android.net.conn.CONNECTIVITY_CHANGE" />
            <category android:name="android.intent.category.DEFAULT" />
        </intent-filter>
</receiver>

<receiver
    android:name="com.xiaomi.push.service.receivers.PingReceiver"
    android:exported="false"
    android:process=":pushservice">
        <intent-filter>
            <action android:name="com.xiaomi.push.PING_TIMER" />
        </intent-filter>
</receiver>

<receiver android:name="com.isoftop.android.pushservice.PushPatchMessageReceiver">
    <intent-filter>
        <action android:name="com.xiaomi.mipush.RECEIVE_MESSAGE" />
        <action android:name="com.xiaomi.mipush.MESSAGE_ARRIVED" />
        <action android:name="com.xiaomi.mipush.ERROR" />
    </intent-filter>
</receiver>
<!-- 小米代理推送必需组件 END -->

<!-- 魅族代理推送必需组件 -->
<activity
    android:name="com.isoftop.android.pushservice.mzproxy.MzNotifyActivity"
    android:launchMode="singleTask"
    android:theme="@android:style/Theme.NoDisplay" />

<receiver android:name="com.isoftop.android.pushservice.MzPushPatchMessageReceiver">
    <intent-filter>
        <action android:name="com.meizu.flyme.push.intent.MESSAGE" />
        <action android:name="com.meizu.flyme.push.intent.REGISTER.FEEDBACK" />
        <action android:name="com.meizu.flyme.push.intent.UNREGISTER.FEEDBACK" />
    </intent-filter>
</receiver>
<!-- 魅族代理推送必需组件 END -->

<!-- OPPO代理推送必需组件 -->
<activity
    android:name="com.isoftop.android.pushservice.opproxy.OpNotifyActivity"
    android:configChanges="orientation|keyboardHidden"
    android:exported="true"
    android:launchMode="singleInstance"
    android:theme="@android:style/Theme.NoDisplay">
    <intent-filter>
        <action android:name="YourPackageName.action.RECEIVE_MCS_MESSAGE" />
        <category android:name="android.intent.category.DEFAULT" />
    </intent-filter>
</activity>
<!-- OPPO代理推送必需组件 END -->

<!-- VIVO代理推送必需组件 -->
<service
    android:name="com.vivo.push.sdk.service.CommandClientService"
    android:exported="true" />

<receiver android:name="com.isoftop.android.pushservice.viproxy.ViPushMessageReceiver">
    <intent-filter>
        <action android:name="com.vivo.pushclient.action.RECEIVE" />
    </intent-filter>
</receiver>

<meta-data
    android:name="com.vivo.push.api_key"
    android:value="INSERT YOUR OWN VIVO APIKEY HERE" />

<meta-data
    android:name="com.vivo.push.app_id"
    android:value="INSERT YOUR OWN VIVO APPID HERE" />
<!-- VIVO代理推送必需组件 END -->
如需开启厂商代理,请声明对应厂商的推送必需组件。配置Manifest文件之后,请将YourPackageName替换成用户自己的包名。
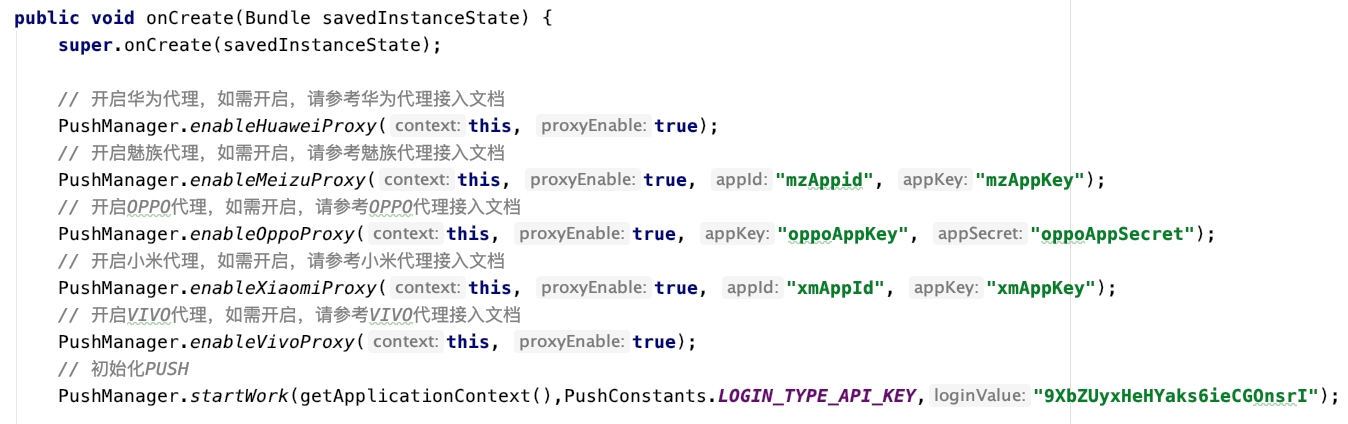
在当前工程的主Activity的onCreate函数中,添加以下代码:
    // 开启华为代理,如需开启,请参考华为厂商接入文档
    PushManager.enableHuaweiProxy(this, true);
    // 开启魅族代理,如需开启,请参考魅族厂商接入文档
    PushManager.enableMeizuProxy(this, true, "mzAppid", "mzAppKey");
    // 开启OPPO代理,如需开启,请参考OPPO厂商接入文档
    PushManager.enableOppoProxy(this, true, "oppoAppKey", "oppoAppSecret");
    // 开启小米代理,如需开启,请参考小米厂商接入文档
    PushManager.enableXiaomiProxy(this, true, "xmAppId", "xmAppKey");
    // 开启VIVO代理,如需开启,请参考VIVO厂商接入文档
    PushManager.enableVivoProxy(this, true);
    // 初始化PUSH
    PushManager.startWork(getApplicationContext(),PushConstants.LOGIN_TYPE_API_KEY,"api_key");
如需开启厂商代理,请调用对应厂商的开关方法,并将必要参数替换为您在厂商推送官网申请的值,最后将“API Key“手动修改为指定应用的API Key。接入厂商推送请参考厂商接入文档。
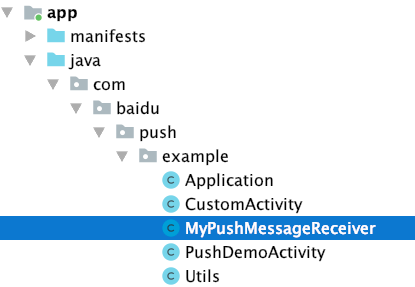
在当前工程中新建一个类,右键点击选择New --> Java Class,填写接收云推送回调信息和推送到达信息的类的类名,并点击OK创建该类文件(本例中使用MyPushMessageReceiver)。
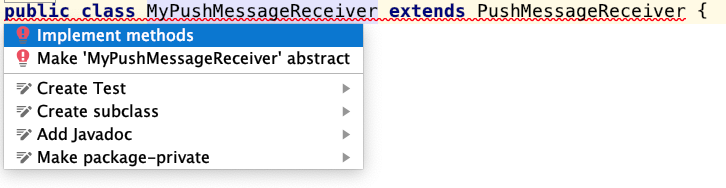
打开新创建的类,继承com.isoftop.android.pushservice.PushMessageReceiver,此时类名飘红,移动到类名上,点击 Implement methods,重载所有的回调函数,并打印对应信息,如图所示:
在当前工程的AndroidManifest.xml文件中,添加自定义Receiver信息如下:
<!-- 此处Receiver名字修改为当前包名路径 -->
<receiver android:name="YourPackageName.MyPushMessageReceiver">
    <intent-filter>
        <!-- 接收push消息 -->
        <action android:name="com.isoftop.android.pushservice.action.MESSAGE" />
        <!-- 接收bind、setTags等method的返回结果-->
        <action android:name="com.isoftop.android.pushservice.action.RECEIVE" />
        <!-- 接收通知点击事件,和通知自定义内容 -->
        <action android:name="com.isoftop.android.pushservice.action.notification.CLICK" />

        <!-- 使用华为代理功能必须声明,用于接收华为的透传 -->
        <action android:name="com.huawei.android.push.intent.RECEIVE" />
    </intent-filter>
</receiver>
选中已连接的设备或Android虚拟机,点击Run按钮运行该程序。如果在logcat中的回调函数中的errorCode为0,说明已经绑定成功,并返回userid和channelid,我们就可以在云控制台推送通知和透传消息到该app了。

在集成SDK后,可以通过以下两种方式推送消息。
通过控制台推送消息。参见:管理控制台
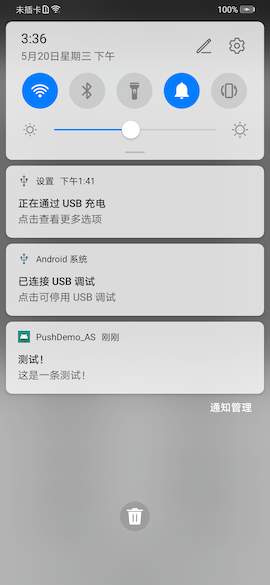
当设备接收到通知消息后,查看手机的通知栏,可以看到通知栏内的新通知展示。如图:
通知到达时,当通知被用户点击时,会回调onNotificationClicked函数。
当设备接收到透传消息时,消息不会在通知栏展示,只是静默回调开发者自定义Receiver中的onMessage函数。手机收到消息后不会有任何现象,因为透传消息对用户完全透明,用户无法感知,便于开发者在不影响用户的情况下对app进行操作。开发者可以通过log内容和自定义的回调函数onMessage中打印该内容,确认消息到达,并执行开发者指定操作。
| error_code | 描述 |
|---|---|
| 0 | 绑定成功 |
| 10001 | 当前网络不可用,请检查网络 |
| 10002 | 服务不可用,连接server失败 |
| 10003 | 服务不可用,503错误 |
| 10101 | 应用集成方式错误,请检查各项声明和权限 |
| 20001 | 未知错误 |
| 30600 | 服务内部错误 |
| 30601 | 非法函数请求,请检查您的请求内容 |
| 30602 | 请求参数错误,请检查您的参数 |
| 30603 | 非法构造请求,服务端验证失败 |
| 30605 | 请求的数据在服务端不存在 |
| 30608 | 绑定关系不存在或未找到 |
| 30609 | 一个D推账户绑定设备超出个数限制(多台设备登录同一个D推账户) |
| 30612 | D推账户绑定应用时被禁止,需要白名单授权 |
如果需要混淆app,请在混淆文件(一般默认为Android工程下proguard-project.txt或者proguard.cfg)中添加以下说明(pushservice-VERSION.jar为集成的jar包名字,VERSION为版本名称),防止SDK内容被二次混淆,无法收到消息,如需开启厂商代理,请添加对应厂商代理的混淆规则。
    -libraryjars libs/pushservice-VERSION.jar
    -dontwarn com.isoftop.**
    -keep class com.isoftop.**{*; }

    # 小米代理推送
    -dontwarn com.xiaomi.**
    -keep class com.xiaomi.**{*; }

    # 魅族代理推送
    -dontwarn com.meizu.cloud.**
    -keep class com.meizu.cloud.**{*; }

    # OPPO代理推送
    -keep public class * extends android.app.Service
    -keep class com.heytap.msp.** { *;}

    # VIVO代理推送
    -dontwarn com.vivo.push.**
    -keep class com.vivo.push.**{*; }
    -keep class com.vivo.vms.**{*; }

    # 华为代理推送
    -ignorewarnings
    -keepattributes *Annotation*
    -keepattributes Exceptions
    -keepattributes InnerClasses
    -keepattributes Signature
    -keepattributes SourceFile,LineNumberTable
    -keep class com.hianalytics.android.**{*;}
    -keep class com.huawei.updatesdk.**{*;}
    -keep class com.huawei.hms.**{*;}
| 类 | 描述 |
|---|---|
| PushManager | 提供了所有使用Push服务的静态方法 |
| PushSettings | 提供了端上Push服务的配置静态方法 |
| BasicPushNotificationBuilder | 用于定制 Android Notification 里的基础样式和行为 |
| CustomPushNotificationBuilder | 用于定制 Android Notification 里的 sound / flags / icon,以及通知栏的layout、图标 和状态栏图标 |
| PushConsants | SDK对外的常量定义 |
| PushMessageReceiver | 自定义接收push消息和通知实现的直接父类 |
Push Android SDK目前支持以下接口:
| 分类 | 功能 | API函数原型 |
|---|---|---|
| Push服务接口 | 提供Push服务 | enableHuaweiProxy, enableXiaomiProxy, enableMeizuProxy, enableOppoProxy, enableVivoProxy, startWork, stopWork, resumeWork, setJobSchedulerId |
| Tag管理接口 | Tag的创建与删除 | setTags, delTags, onListTags |
| 通知管理接口 | 自定义通知样式 | CustomPushNotificationBuilder, BasicPushNotificationBuilder, setNotificationFlags, setNotificationDefaults, setStatusbarIcon, setLayoutDrawable, setNotificationSound, setNotificationBuilder |
| 设置接口 | Push服务设置 | enableDebugMode |
| 异步消息处理接口 | Push消息处理receiver | onBind, onMessage, onNotificationClicked, onNotificationArrived, onSetTags, onDelTags, onListTags, onUnbind |
public static void enableHuaweiProxy(Context context, boolean proxyEnable);
PushManager类定义的静态方法,是否启用华为代理模式。
无
public static void enableXiaomiProxy(Context context,boolean proxyEnable, String appId, String appKey);
PushManager类定义的静态方法,是否启用小米代理模式。
无
public static void enableMeizuProxy(Context context, boolean proxyEnable, String appId, String appKey);
PushManager类定义的静态方法,是否启用魅族代理模式。
无
public static void enableOppoProxy(Context context, boolean proxyEnable, String appKey, String appSecret);
PushManager类定义的静态方法,是否启用OPPO代理模式。
无
public static void enableVivoProxy(Context context, boolean proxyEnable);
PushManager类定义的静态方法,是否启用VIVO代理模式。
无
public static void startWork(Context context, int loginType, String loginValue);
PushManager类定义的静态方法,完成Push服务的初始化,并且自动完成bind工作。
PushConstants.LOGIN_TYPE_API_KEY)通过自定义的Receiver类里onBind方法返回结果,详见 onBind
注意:不要在Application的onCreate里去做startWork的操作。
public static void stopWork(Context context);
PushManager类定义的静态方法,停止本应用Push服务进程,并且完成unbind工作。startWork和resumeWork都会重新开启本应用Push功能。
通过自定义的Receiver类里onUnbind方法返回结果,详见 onUnbind
public static void setJobSchedulerId(Context context, int id);
PushManager类定义的静态方法,设置PushJobService的jobId。JobScheduler在调度PushJobService时默认jobId为1,可以通过此方法修改jobId默认值。
无
public static void resumeWork(Context context);
PushManager类定义的静态方法,恢复本应用Push服务,并且再次完成bind工作。
通过自定义的Receiver类里onBind方法返回结果,详见 onBind
public static boolean isPushEnabled(Context context);
PushManager类定义的静态方法,查询push是否已经被停止。
PushManager.setNoDisturbMode(Context context, int startHour, int startMinute, int endHour, int endMinute);
PushManager类定义的静态方法,设置免打扰模式的具体时段,该时间内处于免打扰模式,通知到达时去除通知的提示音、振动以及提示灯闪烁。
注意:如果开始时间小于结束时间,免打扰时段为当天的起始时间到结束时间;如果开始时间大于结束时间,免打扰时段为第一天起始时间到第二天结束时间;如果开始时间和结束时间的设置均为00:00时,取消免打扰时段功能。
无
public static void setTags(Context context, List tags);
PushManager类定义的静态方法,用于设置标签;成功设置后,可以从管理控制台或您的服务后台,向指定的设置了该tag的一群用户进行推送。
注意:tag设置的前提是已绑定的端,也就是应用有运行过startWork或bind,且在onBind回调中返回成功。
通过自定义的Receiver类里onSetTags方法返回结果,详见 onSetTags
public static void delTags(Context context, List tags);
PushManager类定义的静态方法,用于删除标签。
通过自定义的Receiver类里onDelTags方法返回结果,详见 onDelTags
public static void listTags(Context context);
PushManager类定义的静态方法,用于列出本机绑定的标签。
通过自定义的Receiver类里onListTags方法返回结果,详见 onListTags
public static void setNotificationBuilder(Context context, int id, PushNotificationBuilder notificationBuilder);
PushManager类定义的静态方法,设置通知栏样式,并为样式指定编号。在管理控制台或您的服务后台中,您可以指定相应的编号,让客户端显示预先设定好的样式。
public static void setDefaultNotificationBuilder(Context context, PushNotificationBuilder notificationBuilder);
PushManager类定义的静态方法,设置默认的通知栏样式;如果推送通知时不指定id的样式,都将显示该默认样式。
BasicPushNotificationBuilder();
自定义通知状态栏构建类构造函数(定制通知栏基础样式) 。
CustomPushNotificationBuilder(layoutId, layoutIconId, layoutTitleId, layoutTextId);
自定义通知状态栏构建类构造函数(定制通知栏基础样式及layout)。
public void setNotificationFlags (int flags);
基类PushNotificationBuilder定义的方法,定制 Android Notification 里的flags。
public void setNotificationDefaults (int defaults);
基类PushNotificationBuilder定义的方法,定制 Android Notification 里的defaults。
public void setStatusbarIcon (int icon);
基类PushNotificationBuilder类定义的方法,定制 Android Notification通知状态栏的icon图标。
public void setLayoutDrawable(int drawableId);
CustomPushNotificationBuilder类定义的方法,定制自定义layout中显示的图片。
drawableId :图标资源id
public void setNotificationSound(String soundId);
CustomPushNotificationBuilder类定义的方法,自定义推送的声音。
soundId :声音资源路径
public static void enableDebugMode(boolean debugEnabled);
PushSettings类定义的方法,开启调试模式,会输出调试Log。
注意:发布应用时,请不要开启调试模式,否则会降低Push性能。
public void onBind(Context context, int errorCode, String appid, String userId, String channelId, String requestId);
PushMessageReceiver的抽象方法,把receiver类继承PushMessageReceiver可以使用。调用PushManager.startWork后,sdk将对push server发起绑定请求,这个过程是异步的。绑定请求的结果通过onBind返回。
如果您需要用单播推送,需要把这里获取的channel id上传到应用server中,再调用server接口用channel id给单个手机或者用户推送。
public void onMessage(Context context, String message, String customContentString);
PushMessageReceiver的抽象方法,把receiver类继承PushMessageReceiver可以使用。接收透传消息。
public void onNotificationClicked(Context context, String title, String description, String customContentString)
PushMessageReceiver的抽象方法,把receiver类继承PushMessageReceiver可以使用。接收通知点击的函数。
public void onNotificationArrived(Context context, String title, String description, String customContentString)
PushMessageReceiver的抽象方法,把receiver类继承PushMessageReceiver可以使用。接收通知到达的函数。
public void onSetTags(Context context, int errorCode, List sucessTags, List failTags, String requestId);
PushMessageReceiver的抽象方法,把receiver类继承PushMessageReceiver可以使用。setTags() 的回调函数。
public void onDelTags(Context context, int errorCode, List sucessTags, List failTags, String requestId)
PushMessageReceiver的抽象方法,把receiver类继承PushMessageReceiver可以使用。delTags() 的回调函数。
public void onListTags(Context context, int errorCode, List tags, String requestId);
PushMessageReceiver的抽象方法,把receiver类继承PushMessageReceiver可以使用。listTags() 的回调函数。
public void onUnbind(Context context, int errorCode, String requestId);
PushMessageReceiver的抽象方法,把receiver类继承PushMessageReceiver可以使用。PushManager.stopWork() 的回调函数。
Push服务初始化及绑定时标识绑定认证方式(无账号认证方式)。
如果以上信息无法帮助你解决在开发中遇到的问题,请通过以下方式联系我们:
邮箱:push-support@isoftop.com,D推的工程师会在第一时间回复您。
D推官方技术讨论群:513637288